Transform reclaimed wood platforms into a striking headboard for under $50 by repurposing four standard-sized skids, sanding them thoroughly, and applying a whitewash stain for a rustic-chic aesthetic. Elevate your outdoor entertainment space with a custom-built sectional sofa constructed from these recycled components; reinforce the base with galvanized steel brackets for enhanced stability and weather resistance.
Seeking budget-friendly home enhancements? Construct a vertical garden using repurposed platforms, securing planters with heavy-duty staples and landscape fabric lining. Integrate an automatic watering system for effortless maintenance. For interior design, craft a unique coffee table; disassemble the planks, arrange them in a herringbone pattern, and protect the surface with a clear epoxy resin coating.
Maximize storage potential with floating shelves crafted from dismantled skids. Achieve a streamlined look by sanding the boards to a smooth finish and mounting them with concealed brackets. Alternatively, repurpose the wood to create custom artwork: apply stencils and acrylic paint to create personalized wall hangings. Remember to prioritize safety; always wear safety glasses and gloves when working with reclaimed materials.
Upcycled Skid Coffee Tables: Raw Wood Transformed into Chic Centerpiece
Opt for heat-treated skids (identified by the IPPC stamp) to avoid chemical contamination. For a modern aesthetic, sand the timber thoroughly with 80-grit, then 120-grit, then 220-grit sandpaper. Apply two coats of water-based polyurethane varnish for a durable, low-VOC finish.
Leg Options and Height Customization
Attach hairpin legs (available in various heights from 4″ to 28″) for a minimalist look. Secure them using wood screws of appropriate length (typically 1-1/4″ to 1-1/2″). If you prefer a lower table, consider using heavy-duty casters. For a rustic vibe, utilize reclaimed wood as support beams, fastened with lag bolts.
Adding Functionality and Style
Incorporate a recessed glass top for a smooth surface and to showcase the wood’s texture. Cut a piece of tempered glass to the exact dimensions of the interior void within the timber platform’s structure. Consider filling the voids with epoxy resin mixed with pigments to create a customized color scheme. Secure any loose boards with wood glue and clamps before finishing.
Tip: Before disassembly, photograph the timber structure. This provides a reference during reassembly if you’re modifying the original configuration.
Cost Breakdown
Anticipate spending $30-$75 on hardware (legs, screws, varnish, sandpaper). The cost of heat-treated skids is usually free or minimal ($5-$15), sourced from local businesses. Epoxy resin can add significantly to the cost, depending on the volume needed. A sheet of tempered glass will be from $40-$100, depending on the size.
Building Wooden Skid Headboards: Design & Attachment Techniques
To prevent unevenness, select timber skids of uniform thickness for your headboard construction. Standardize material to avoid complications during assembly.
Design Considerations
Opt for a horizontal layout to visually widen smaller rooms. Conversely, a vertically oriented headboard will accentuate ceiling height.
For a rustic aesthetic, preserve the original skid markings and stamps. Seal them with a matte polyurethane to prevent smudging and preserve the look.
Incorporate integrated lighting by routing channels behind the planks for LED strip lights. This provides ambient light without taking up bedside table space.
Attachment Methods
Direct wall mounting offers stability. Use heavy-duty Z-bar hangers or French cleats to distribute weight evenly.
Bed frame attachment: Construct a sturdy support frame from dimensional lumber (2x4s are suitable). Secure the skid planks to the support frame with wood screws. Then, bolt the support frame to your existing bed frame using appropriate hardware.
Consider a floating headboard look by attaching the skid structure to the wall several inches above the bed frame. This creates a visually appealing gap and simplifies cleaning.
Use construction adhesive, in conjunction with screws, for a bond that increases the headboard’s longevity.
Upcycled Wood Vertical Gardens: Maximize Space, Minimize Cost
Construct a tiered vertical garden using repurposed wood planks for herbs and succulents. Apply a food-safe sealant to interior surfaces to prevent soil contamination. Angle the wood planks slightly backward to facilitate water drainage and prevent soil erosion.
Choosing the Right Wood
Opt for heat-treated (HT) wood, indicated by an “HT” stamp. This signifies it hasn’t been chemically treated. Avoid wood with “MB” markings, indicating methyl bromide fumigation, which is toxic. Untreated cedar is a suitable, naturally rot-resistant option.
Construction Techniques
Utilize galvanized nails or screws for assembly to prevent rust. Reinforce joints with wood glue for added stability. Line each planting tier with landscape fabric to retain moisture and prevent soil loss. Space plants according to their mature size to avoid overcrowding. Implement an automated drip irrigation system to ensure constant watering, reducing manual upkeep.
Cost Breakdown
Repurposed lumber: $0 – $20 (depending on sourcing). Galvanized hardware: $5 – $15. Landscape fabric: $5 – $10. Soil and plants: Variable, depending on selection. Sealant (optional): $10 – $20. The total expense, utilizing salvaged lumber, can range from $20 to $65, significantly less than purchasing a ready-made vertical planter.
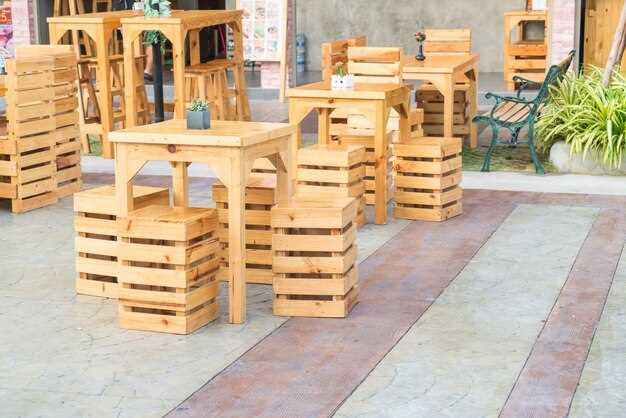
Timber Deck Seating: Sturdy & Budget-Friendly Backyard Furnishings
To construct durable outside seating, source heat-treated skids (identified by the “HT” stamp) to ensure resistance to insects and decay. Prioritize skids with minimal damage. Before assembly, thoroughly clean and sand surfaces to eliminate splinters and grime. Applying a sealant or exterior stain provides prolonged weather protection.
For a simple bench, stack two skids for the base, securing them with heavy-duty screws or construction adhesive. Attach a third skid, cut to size, for the backrest, angling it slightly for comfort. Add outdoor cushions and throws for enhanced seating experience.
Consider constructing a sectional sofa. Assemble individual skid modules, fastening them together to form desired configuration. Reinforce joints with metal brackets for added stability. Customize dimensions to fit your space. A weather-resistant fabric cover offers extra safety for cushions.
Elevate your seating by adding wheels for mobility. Choose heavy-duty casters with locking mechanisms. This permits easy repositioning for cleaning or rearranging your outside setup.
For a rustic table to accompany seating, join two or three sanded and sealed skid tops. Attach sturdy legs made from reclaimed lumber or metal pipes. Ensure the table height is proportionate to your seats for comfortable dining or lounging.
Remember to regularly inspect your timber seating for signs of wear and tear. Apply additional sealant or stain as required to preserve its integrity and appearance. Minor repairs, such as replacing loose screws, will prolong lifespan of your constructed outdoor furnishings.
Q&A
I’m completely new to DIY. Are pallet projects really suitable for a beginner, or are they more for experienced woodworkers? What are some absolutely basic tools I’d need?
Pallet projects can be great for beginners! The key is to start small and simple. Think about a basic coffee table or a simple headboard. You don’t need a fancy workshop. A hammer, saw (hand saw is fine to start!), some nails or screws, a measuring tape, sandpaper, and maybe a pry bar for disassembling pallets are good to have. Safety glasses are a must! Look for tutorials specifically labeled “beginner friendly” and don’t be afraid to make mistakes – that’s how you learn. With a little patience, you can definitely create something cool.
Where is the best place to find pallets? I’ve heard some pallets are treated with nasty chemicals. How can I tell if a pallet is safe to use for, say, indoor furniture?
Finding pallets can be tricky. Many businesses are happy to give them away (check behind grocery stores, hardware stores, or construction sites), but always ask permission first! The big concern is treatment. Look for the IPPC stamp – it’s usually a small symbol on the pallet. “HT” means heat treated, which is generally safe. “MB” indicates methyl bromide, a pesticide that is **not** safe for reuse, especially indoors. Avoid pallets with any chemical odors or stains. If you’re unsure, it’s best to err on the side of caution and not use it, or use it only for outdoor projects where ventilation is good. Consider sourcing from pallet recyclers, as they often inspect and treat pallets for safe reuse.
I love the idea of using pallets to build a garden planter, but I worry about the wood rotting quickly. What can I do to protect the pallet wood from moisture and extend its life outdoors?
Protecting pallet wood for outdoor use is important. First, choose pallets that appear to be in good condition with minimal rot. Second, apply a sealant or wood preservative specifically designed for outdoor use. There are many options available at your local hardware store. A clear sealant will show off the wood’s natural grain, while others offer added color or UV protection. Make sure you follow the manufacturer’s instructions for application. Another good idea is to line the inside of your planter with a plastic liner or landscape fabric before adding soil. This will prevent direct contact between the soil and the wood, helping to slow down the rotting process. Also, ensuring proper drainage is key; drill some holes in the bottom of the planter to allow excess water to escape.
I’m interested in creating a pallet headboard, but I’m worried about splinters and rough edges. What’s the best way to prepare the wood for this type of project?
Preparing pallet wood for a headboard requires a bit of elbow grease, but it’s crucial for a safe and comfortable finished product. Start with a thorough sanding. Use coarse sandpaper to remove any rough edges, splinters, and obvious imperfections. Then, move to a finer grit sandpaper for a smoother finish. Pay special attention to the edges and corners. After sanding, you can apply a wood filler to any remaining holes or cracks. Once the filler dries, sand it smooth. Finally, apply a sealant or varnish to protect the wood and prevent further splintering. Consider applying multiple coats of sealant, sanding lightly between coats for an extra smooth finish. Remember, you will lean on it!
I want to build a pallet coffee table, and I’m considering adding wheels to it. What type of wheels would you recommend, and how do I attach them securely to the pallet wood?
Adding wheels to a pallet coffee table is a great way to make it more versatile. For indoor use, consider swivel casters with a non-marking surface to protect your floors. The size and type of wheels depend on the desired height and the weight the table will support. Heavy-duty casters with a higher weight capacity are a good option. To attach the wheels securely, use bolts and nuts rather than just screws. Pre-drill pilot holes slightly smaller than the bolt diameter to prevent the wood from splitting. If the pallet wood is thin, you might want to add reinforcing plates or blocks of wood to the underside of the table where the wheels will be attached. This will distribute the weight and prevent the bolts from pulling through the wood over time. Ensure the casters have a locking mechanism to keep the table from rolling around unintentionally.
What’s the best way to find safe pallets for these projects? I’ve heard some can be treated with chemicals that are harmful.
Finding safe pallets is something you should do if planning a pallet project! Pallets are often marked with codes indicating how they were treated. Look for the “HT” stamp, which means the pallet was heat-treated, a safe method. Avoid pallets marked with “MB,” which signifies methyl bromide fumigation – a hazardous pesticide. It’s also wise to avoid pallets that look stained or have a strong odor. Ask the source of the pallets about their previous contents. Pallets used to transport food items are preferable to those used for industrial materials. When in doubt, it’s best to err on the side of caution and choose a different pallet or source new, untreated wood for your project.